This guide explains how to install CC Switch and use it to connect Claude Desktop to Token Station. Once configured, CC Switch maps the Sonnet, Opus, and Haiku roles requested by Claude Desktop to selected models in Token Station.
This guide is for the Claude Desktop panel in CC Switch. Claude Desktop and the Claude Code CLI use different configuration paths. Do not apply the Claude Code CLI instructions to this setup.
Install CC Switch
CC Switch is a desktop application for managing AI tool providers. It supports tools including Claude Desktop, Claude Code, Codex, and Gemini CLI.
Configuring these tools directly usually requires editing separate configuration files or environment variables. CC Switch brings tools and providers into one graphical interface, where you can save several configurations and switch between them without repeatedly entering API endpoints and keys.
macOS users can install it with Homebrew:
brew install --cask cc-switchWindows and Linux users, as well as macOS users who prefer manual installation, can download the package for their system from CC Switch Releases and follow the instructions on the release page.
Before you start
You need the following in place:
- CC Switch installed and able to open
- Claude Desktop installed and able to start
- A valid Token Station API key
- Access to the models you plan to use, and credit to spend on them
Open the Token Station dashboard, copy the API key, and confirm the complete IDs of the models you plan to use. Keep the API key out of screenshots, chat messages, and version control.
Configuration flow
The complete setup is:
- Create a Claude Desktop provider in CC Switch
- Enter the Token Station endpoint and API key
- Turn on Needs model mapping
- Map Sonnet, Opus, and Haiku to Token Station model IDs
- Enable the CC Switch routing service and Claude routing
- Enable the provider and fully restart Claude Desktop
- Send a request and verify it in Token Station
Skipping model mapping or local routing can leave the app on its previous service even when CC Switch shows Token Station as the current provider.
Add the Token Station provider
1. Create a provider
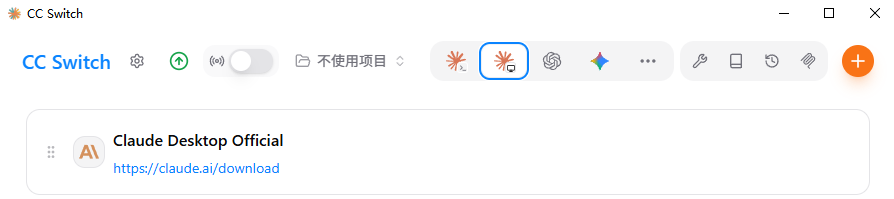
Open CC Switch, select Claude Desktop in the top toolbar, enter provider management, and click Add, New Provider, or the plus button.
2. Enter the connection settings
Give the provider a recognizable name:
Token StationIf a provider type or API format is required, select Claude, Anthropic, or Anthropic Messages (native).
| Field | Value |
|---|---|
| Request URL / Base URL | https://models.bytefuture.ai |
| API Key / Auth Token | Your Token Station API key |
| API format | Anthropic Messages (native) |
| Needs model mapping | On |
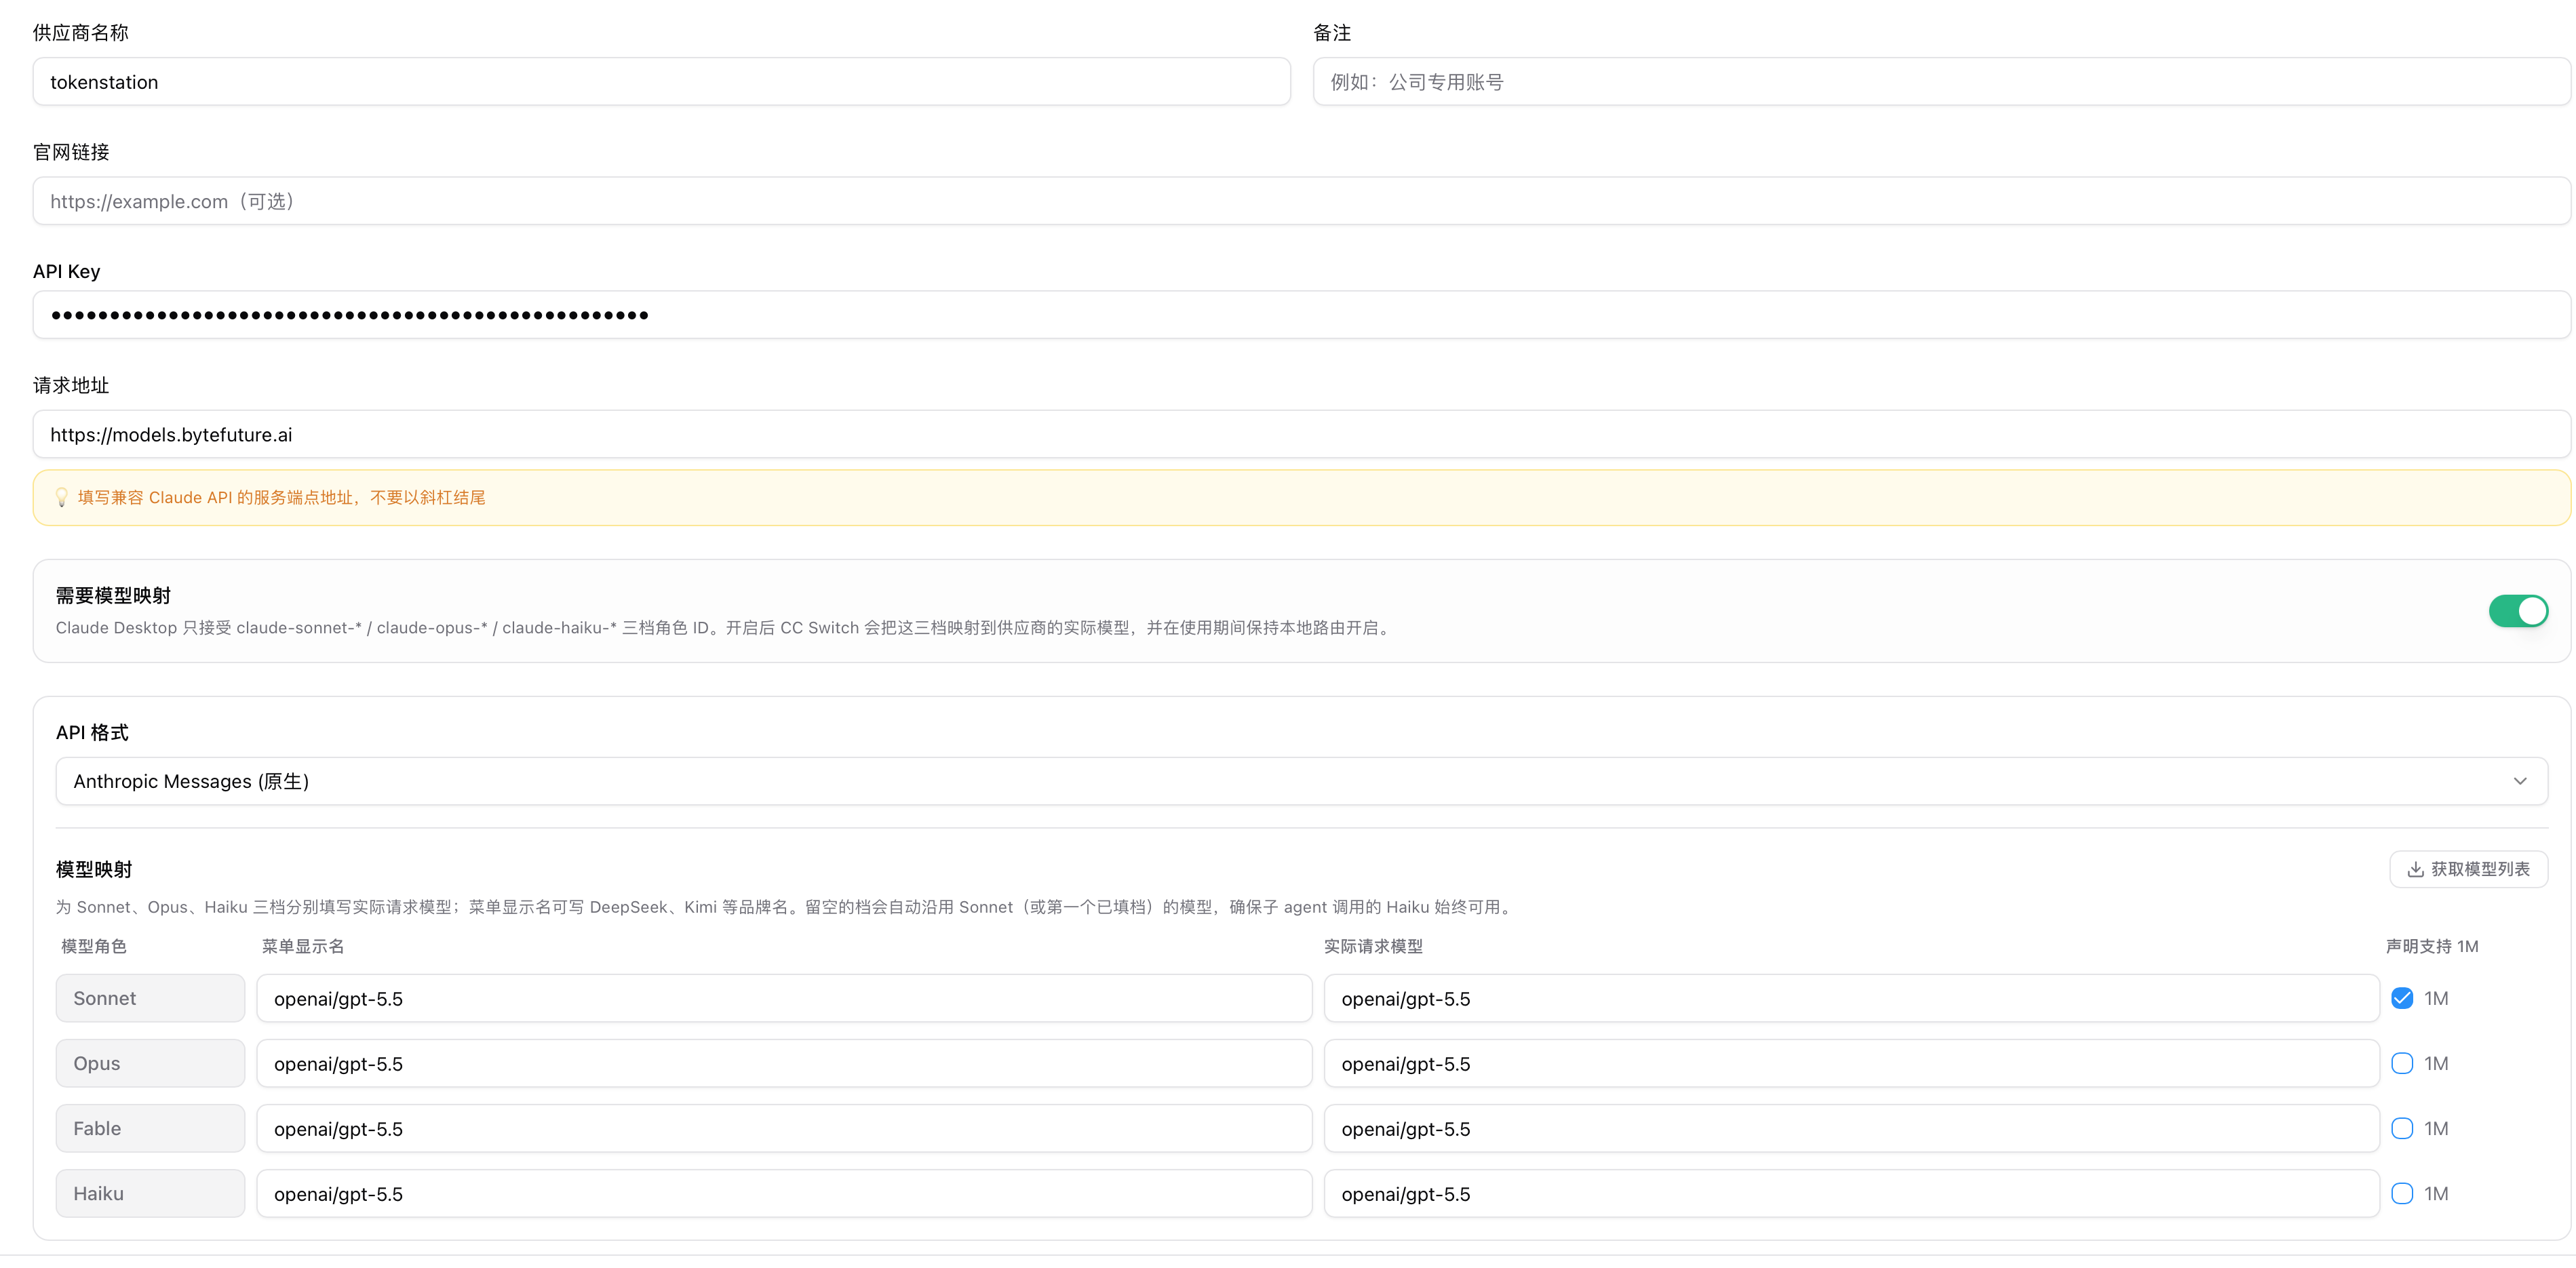
Do not append /v1/messages to the base URL. The client builds the request path, and duplicating it can cause a 404 response.
If your CC Switch version displays environment variables, use:
ANTHROPIC_BASE_URL=https://models.bytefuture.ai
ANTHROPIC_AUTH_TOKEN=<YOUR_TOKEN_STATION_API_KEY>
ANTHROPIC_MODEL=<FULL_MODEL_ID>
Some templates use ANTHROPIC_API_KEY instead of ANTHROPIC_AUTH_TOKEN. Follow the fields shown by your current template. Do not fill several undocumented credential fields at the same time.
3. Turn on Needs model mapping
The Needs model mapping switch must be On. Claude Desktop requests models by Claude roles such as Sonnet, Opus, and Haiku. CC Switch must translate those roles into the full model IDs understood by Token Station.

If this option is disabled, selecting a Claude role can send an unmapped model name and produce a model-not-found error, or the app may continue using an unintended route.
Configure model mapping
Open the model mapping area for the Token Station provider and assign each Claude role to a complete Token Station model ID. A practical starting point is:
| Claude role | Token Station model |
|---|---|
| Sonnet | openai/gpt-5.6-terra |
| Opus | openai/gpt-5.6-sol |
| Haiku | openai/gpt-5.6-luna |
These IDs are examples. Model availability changes, so confirm the current IDs and your account access in Token Station before saving. Preserve the provider prefix, such as openai/:
openai/gpt-5.6-solSonnet is normally used for the default general-purpose role, Opus for more demanding work, and Haiku for faster or lighter tasks. You can map them differently according to cost, latency, and model availability. The important point is that every requested role resolves to a valid Token Station model.
Enable CC Switch local routing
This is the step most often skipped, and skipping it is why the app keeps answering from its old service. Enabling the provider is not enough on its own: the mapping is applied by the CC Switch service running on your computer, so that service has to be up.
- Open CC Switch Settings → Routing
- Turn on Show local routing switch on the home page
- Start or keep the routing master switch running
- Enable Claude under routing
- Return to the Claude Desktop panel and turn its local routing toggle On
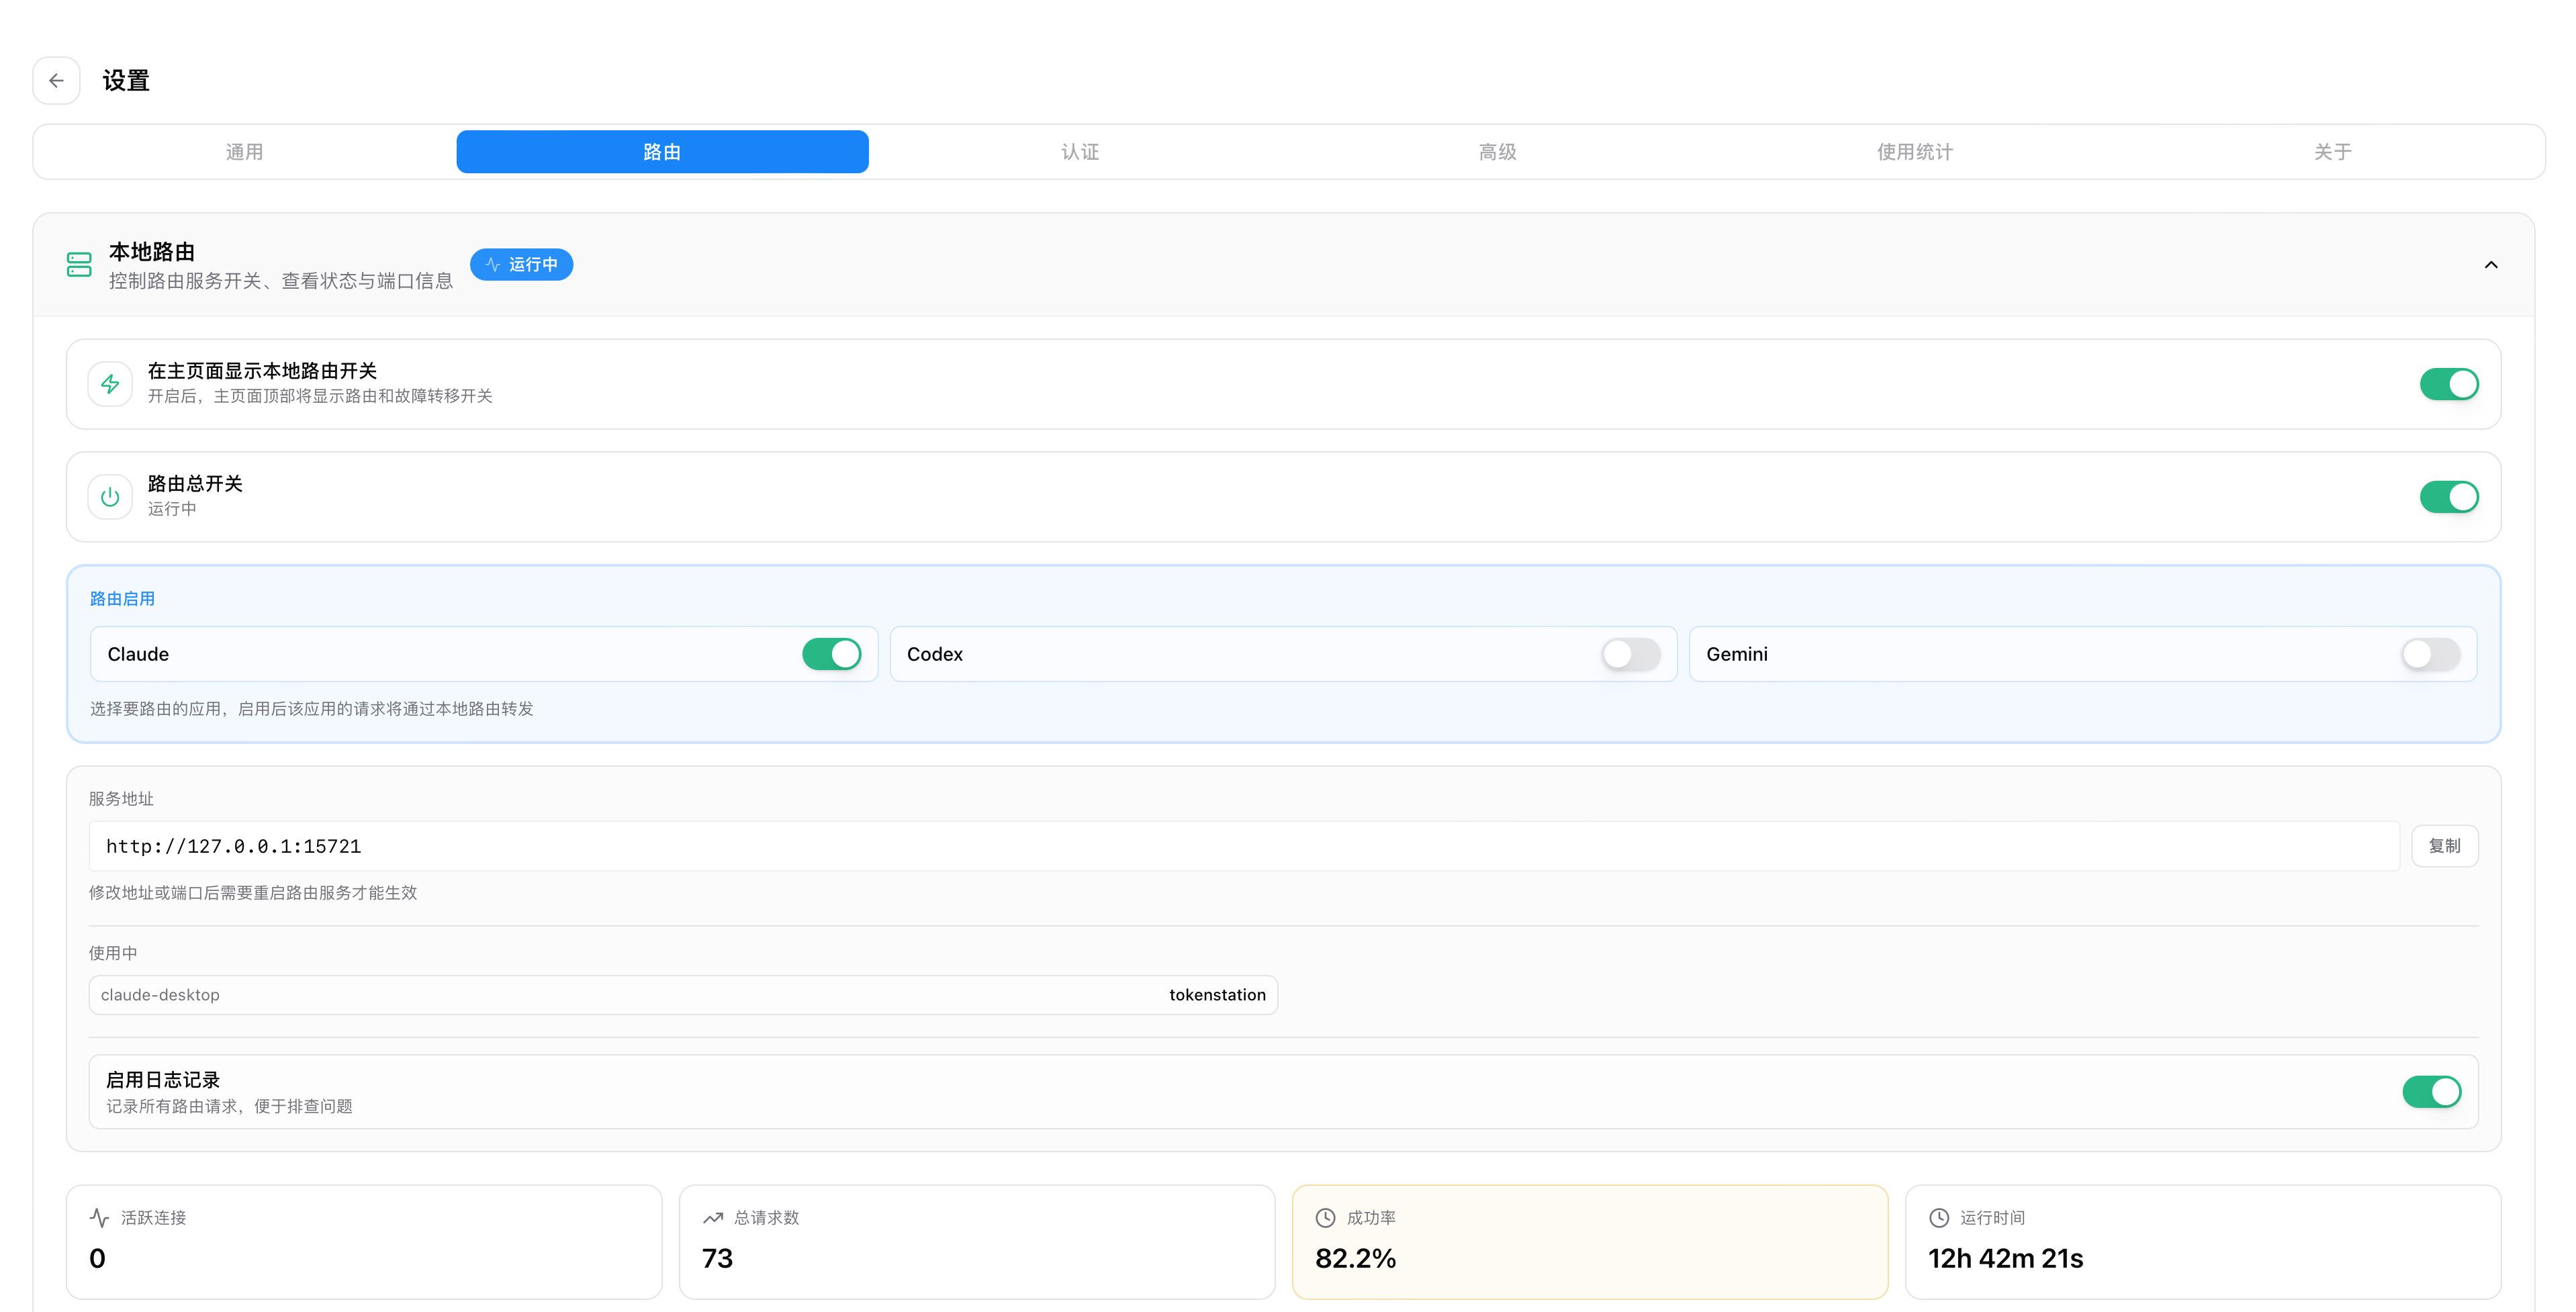
CC Switch must remain open while this route is in use. Quitting it stops the local gateway and Claude Desktop can no longer reach Token Station through this configuration.
Save, enable, and restart
Before saving, confirm that the URL has no extra path, the API key has no surrounding whitespace, Needs model mapping is On, and every model ID includes its provider prefix.
Save the provider, select Token Station, and click Enable, Apply, or Switch. Then completely quit Claude Desktop and reopen it. Closing only the window may leave the process running with its old configuration.
On Windows, check the system tray and choose Quit if necessary. On macOS, use Command + Q. Keep CC Switch and its routing service running when you reopen Claude Desktop.
Use Claude Desktop without an Anthropic account
After configuring CC Switch, you can connect Claude Desktop to its local gateway through the third-party inference feature without first signing in to an Anthropic account. The steps below use Claude Desktop for Windows. Menu locations may differ slightly on other systems or versions.
1. Enable Developer Mode
Open the menu in the upper-left corner of Claude Desktop, then select Help → Troubleshooting → Enable Developer Mode.
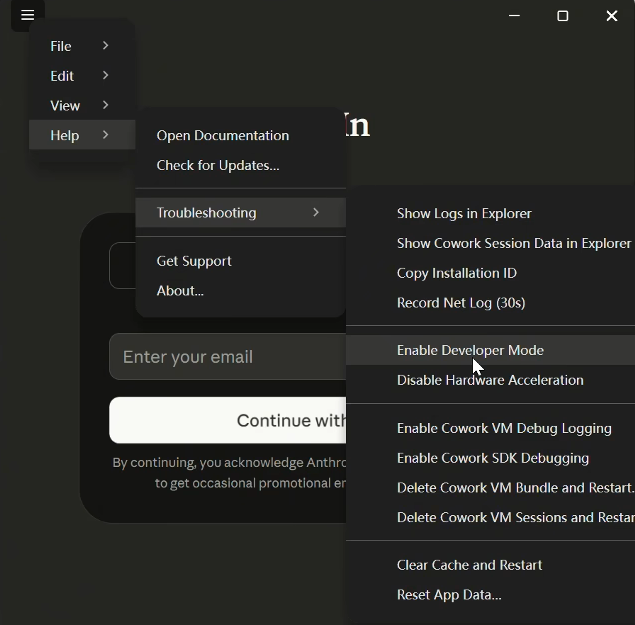
The Developer entry should now appear in the main menu. If it does not appear immediately, completely quit Claude Desktop and reopen it.
2. Open the third-party inference settings
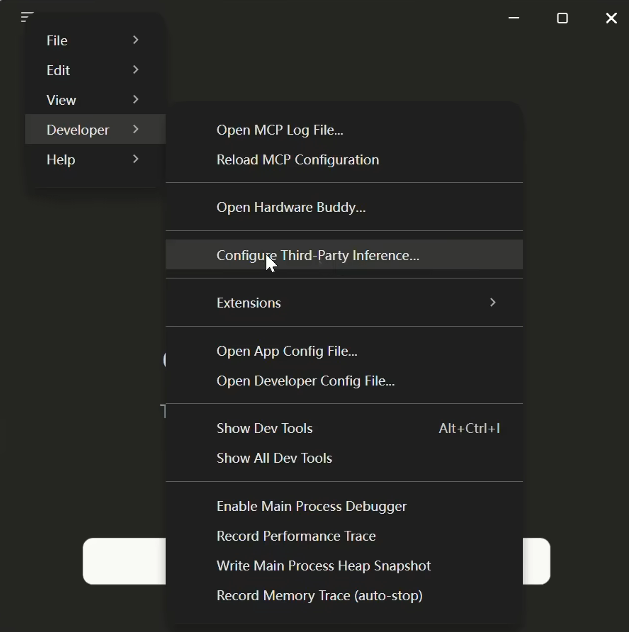
From the upper-left menu, select Developer → Configure Third-Party Inference….
3. Apply the CC Switch configuration
On the settings page, confirm that CC Switch appears in the upper-right corner and that Connection is set to Gateway. If the provider and local routing were configured correctly, CC Switch automatically fills the Gateway base URL, API key, and authentication scheme.
Do not enter or change anything on this page. Click Apply locally at the bottom.
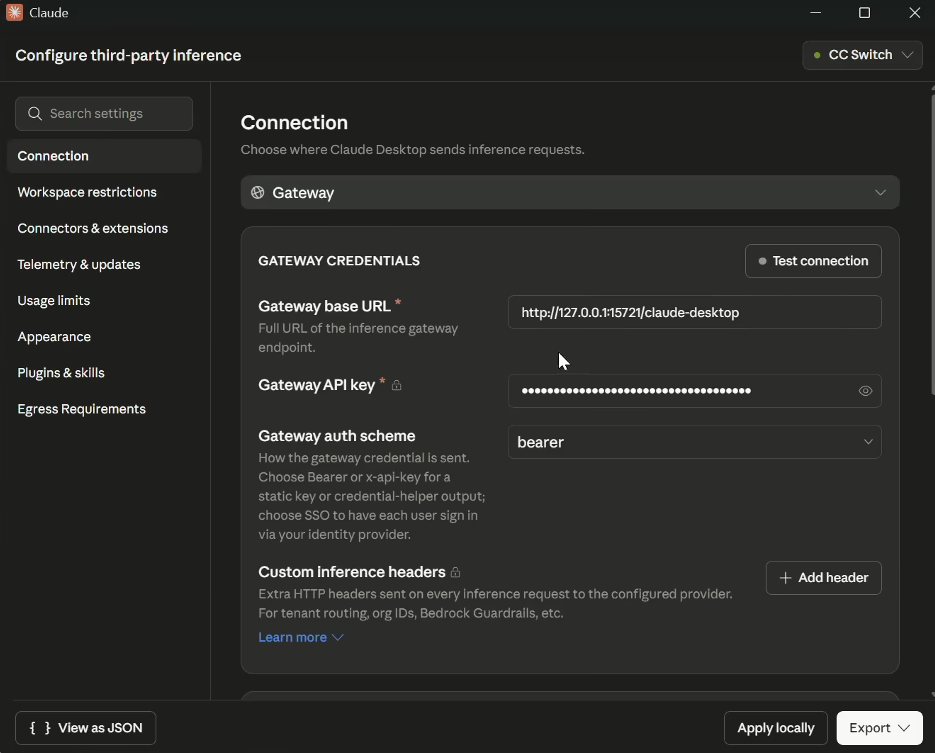
Claude Desktop will now send inference requests through the CC Switch local gateway. Keep CC Switch and local routing running while you use it. Treat the Gateway API key as sensitive even when CC Switch generated it automatically. Do not publish screenshots that reveal it or share it with anyone.
Verify the complete route
Start a new conversation in Claude Desktop and send:
Reply only: Token Station test succeededAfter the response arrives, open the Token Station dashboard and check Recent Activity or the request log. Confirm that:
- The new request appears at the expected time
- The request completed successfully
- The recorded model matches the role mapping in CC Switch
A response in the app and a matching Token Station record together prove that the complete route is active. The Current Provider label in CC Switch is not sufficient evidence by itself.
Switch back to the original provider
Keep the official provider instead of overwriting it. To restore it, select the original provider, click Apply or Switch, turn off the Token Station route if it is no longer needed, fully quit Claude Desktop, and reopen it.
Troubleshooting
The app still uses the old provider
Fully quit the app, apply the Token Station provider again, confirm local routing and Claude routing are On, then reopen the app.
Model mapping is disabled
Edit the provider, enable Needs model mapping, and verify that Sonnet, Opus, and Haiku point to valid Token Station model IDs. Save and reapply the provider.
Local routing is off
Open Settings → Routing, start the routing service, enable Claude routing, and turn on the local routing switch in the Claude Desktop panel.
CC Switch is not running
The local gateway exists only while CC Switch is running. Reopen CC Switch, start routing, and retry the request.
API key is missing, or the response is 401 or 403
Check whether the template expects ANTHROPIC_AUTH_TOKEN or ANTHROPIC_API_KEY. Verify that the key is valid, contains no extra whitespace, and has access and credit for the selected model.
The response is 404
Use https://models.bytefuture.ai as the base URL and remove manually appended /messages, /v1/messages, or other repeated paths.
Model not found or access denied
Copy the complete model ID from Token Station and verify the corresponding Sonnet, Opus, or Haiku mapping. Do not infer an ID from the app’s display name.
The app responds, but Token Station has no record
The request may still be using the original service. Check the active provider, model mapping, both routing switches, the app restart, the Token Station account, and the activity time filter.
Security notes
- Keep real API keys out of tutorial screenshots
- Do not commit CC Switch configuration files or credentials to Git
- Revoke and replace a key immediately if it may have leaked
- Back up a working provider before upgrading CC Switch or Claude Desktop
Summary
This setup depends on four parts working together: a Token Station provider, Needs model mapping, CC Switch local and Claude routing, and a complete restart of Claude Desktop. Verify the result in the Token Station activity log so you know which service and model handled the request.